I’ve Moved!
Hi, I am so excited to tell you that Little Hands, Big Imaginations is now hosted on The Teachers’ Lounge. Just click here! Check out all the cool content and if you’re looking specifically for my posts, click here!
Please change your bookmarks so you can keep up with my latest projects!
Craft and Connect: Tie-Dye Craft Stick Buildings
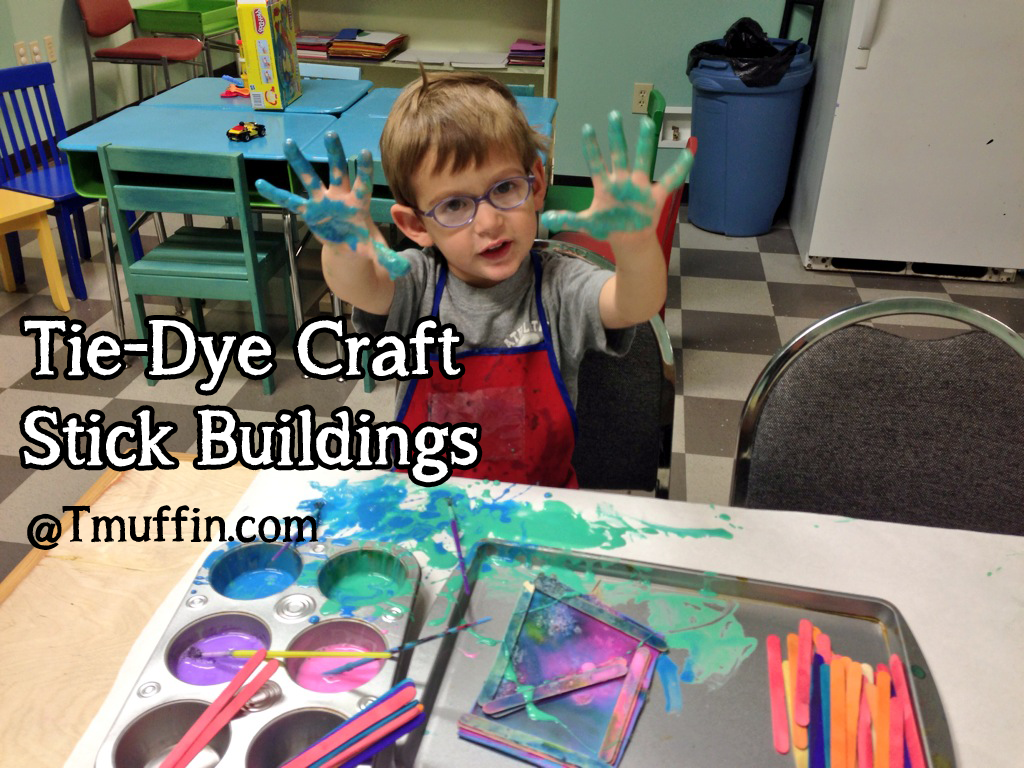
Make a colorful stick structure with a unique, tie-dye look. This super-simple activity really occupies kids for quite a long time.
This is what you’ll need:
- Colored craft sticks
- White glue
- Liquid watercolors
- Paint Brushes
- No-spill paint containers, plastic cups, or muffin tin to mix and hold your paint
- Cardboard rectangle or square for the base.
- Tray or paper to protect your work surface
Step 1 – Prepare the Tie-Dye Paint
Pour white glue into your paint containers and add a few drops of liquid watercolor to each. Mix until you achieve your desired color.
Connect: Have your child help mix the color into the glue. For an educational experience, use only primary colors and mix them to make orange, green, and purple.
Step 2 – Construct
Give your child a bunch of craft sticks, glue, and paint brushes. Use the cardboard as the base, show your child how to spread glue on one stick and stack another one on top.
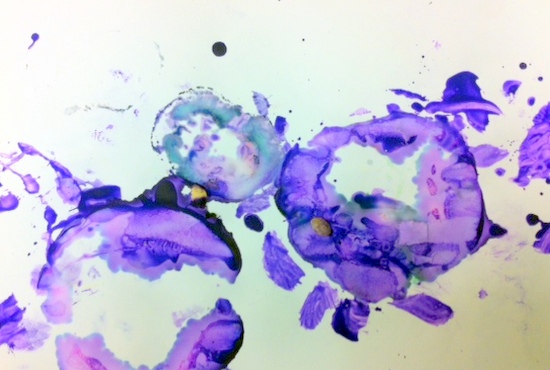
Connect: Encourage your child to make different shapes with the craft sticks. Talk about how the paint colors mix together as you add different hues. These structures might remain low and wide, or your child might stack sticks up very high. Don’t interfere with the creativity… As you can see from the picture, one of the most fun parts of this activity is seeing how the color flows together and stays super bright.
Product Recommendations from Discount School Supply®:
Colorations® Washable School Glue
Colorations® Craft Cups – Set of 100
Colorations® Double-Dip Divided Paint Cups – Set of 5
Colorations® Easy-Grip Paint Brushes – Set of 10
Natural Craft Stick Classroom Pack – 1200 Pieces
Colored Craft Sticks Classroom Pack – 1200 Pieces
Colorations® Classic Colors Liquid Watercolor Paints, 8 oz. – Set of 13
Activity Hour: Rainbow Foam Dough

This activity is definitely messy, but kids love the soft feel of the foam. It’s great for color identification and sensory play.
What You’ll Need:
- Shower curtain or vinyl tablecloth to protect your surface (or do the activity in the bathtub!)
- Shaving cream
- Cornstarch
- Liquid watercolors
- Empty cups or containers
- Funnels, spoons, cups, molds, and other tools (you can use tools that you typically use with Play-doh)
Step 1 – Prepare the dough
Fill the cups/bowls about half full with shaving cream. Add a few drops of Liquid watercolors and mix until desired color/brightness is achieved. Sprinkle in some cornstarch (We used about 2:1 shaving cream to cornstarch). Mix it until it comes together and forms a somewhat crumbly dough.
*Tips for Parents: If your child isn’t in the “spoon it out and launch it across the room phase,” the mixing process might be fun for him or her to take part in. Have him or her feel the dough as you mix. It’s so soft and foamy!
Step 2 – Pour, dump, and explore!
Now the sensory fun begins. Put the different colored tubs of rainbow foam dough out for the kids to explore with their tools.
*Tips for Parents: Some kids are hesitant when it comes to exploring new sensations. Encourage your child to use the tools before asking him or her to touch the dough directly. Add rice for sprinkles, or use ice scream scoopers to take your imagination one step further and play ice cream parlor.
Product Recommendations from Discount School Supply®:
Colorations® Craft Cups – Set of 100
Colorations® Classic Colors Liquid Watercolor Paints, 8 oz. – Set of 13
Craft and Connect: Shaving Cream Paint
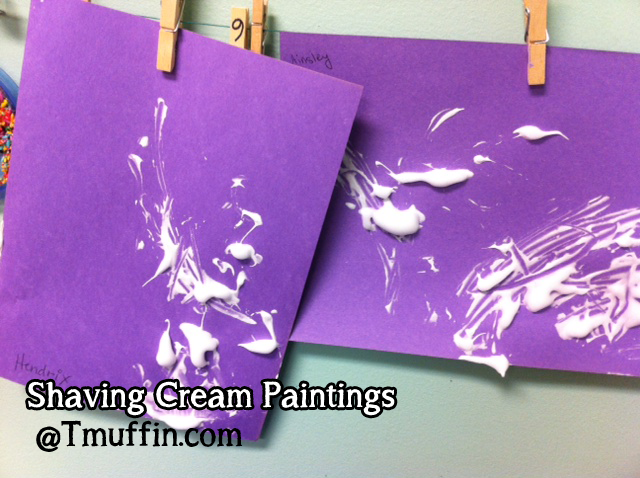
Get super creative with this three-dimensional paint that stays exactly where you put it.
This is what you’ll need:
- Colored construction paper
- Shaving cream
- White glue
- Small cups for mixing the paint mixture
- Painting tools – paint brushes, craft sticks, combs, spoons, etc.
- Glitter
Step 1 – Prepare the Shaving Cream Paint
Mix shaving cream and white glue. Most recipes say to mix equal parts of each, but we squirted shaving cream into cups and added just a dollop of glue, and the painting worked just fine.
Connect: Have your child help squirt the shaving cream into the cup. He or she will enjoy having control of this part of the project.
Step 2 – Paint
Using your painting tools, make a design on the paper.
Connect: Talk about how the paint looks and feels. If it’s thick and it doesn’t pour easily have your child use different motions to get the paint out of the cup. Try turning the cup upside down. Try scooping out the paint and tapping it on the paper.
Step 3 – Get Creative!
Four year olds are much more creative than we adults are. It was my son’s idea to draw cupcakes and add the paint as icing, decorating it with sprinkles (glitter).
Connect: Be receptive to your child’s ideas. This paint holds glitter well. You could also make a snowman and add small objects, like toothpicks, jewels, and buttons. Ask your child “What can we make with this paint?” Make it your goal to say yes to whatever your child suggests.

Product Recommendations from Discount School Supply®:
Colorations® Construction Paper Smart Pack – 600 Sheets
Colorations® Washable School Glue
Colorations® Craft Cups – Set of 100
Colorations® Easy-Grip Paint Brushes – Set of 10
Natural Craft Stick Classroom Pack – 1200 Pieces
Colorations® Easy Shake Glitter – Set of 12
Sparkling Flower Jewels – 300 Pieces
Activity Hour: Salt Painting
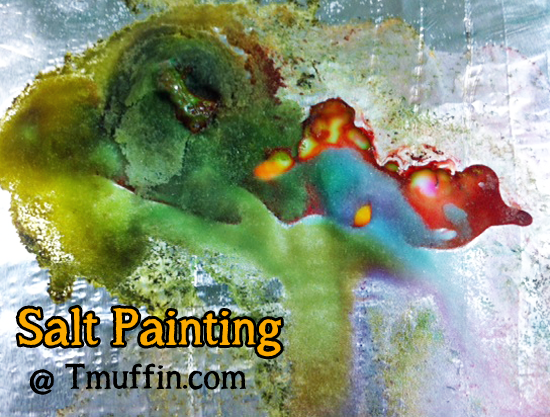
This activity combines art with experimentation and gross motor skills to satisfy even the kid who won’t sit still for anything.
What You’ll Need:
- Tray
- Cardboard (paper is too flimsy for this project)
- 1.25 oz glue container
- Salt in a shaker
- Liquid watercolors
- Eye droppers
- Spill-proof containers
- Aluminum foil (optional—use this to cover the cardboard for a unique project surface)
Step 1 – Draw with glue
Put the cardboard on a tray to contain any stray glue, salt, or liquid watercolor. Give your child the glue and ask him or her to “draw” with it. Allow the child to squeeze as much glue out as he wants—we’ll need a lot of glue for this project.
*Tips for Parents: Show your child how to squeeze the glue in different ways. Hold the glue bottle up high while squeezing. Now hold it down low. Move it around quickly, then slowly. Your child can use big or small movements to get the glue on the surface.
Step 2 – Shake, shake, shake!
Have your child shake salt all over the glue. The glue will need to be completely covered with salt.
*Tips for Parents: If salt comes out of the shaker too quickly, tape up some of the holes. If it comes out too slowly, cut some more holes. If your child shakes a little salt out and then is finished, encourage him or her to continue by singing and shaking to the rhythm. Explain that all the shiny glue needs to be covered by salt.
Step 3 – Add color
Add some water to the liquid watercolors in several spill-proof containers (one for each color). Have your child use an eye dropper to transfer liquid watercolor to the salt on his or her artwork.
*Tips for parents: Point out how the salt sucks up the color and makes it appear to move magically through the salty surface. Let your child use as much color as he or she wants—you can always gently pat a paper towel on top of the entire project to soak up the extras.
Product Recommendations from Discount School Supply®:
Brawny Tough Plastic Art Trays – Set of 5
Colorations® Washable School Glue – 1.25 oz
Colorations® Classic Colors Liquid Watercolor Paints, 8 oz. – Set of 13
Craft and Connect: DIY Puff Paint

Make some special holiday drawings using inexpensive puff paint that you can make yourself. This provides kids with a different method of painting and gets them to use their muscles to squeeze, which is great for their fine motor skills.
This is what you’ll need:
- Art paper (the paper must be thick to support the weight of the puff paint. Card-stock works well)
- Squeeze bottles
- Powdered tempera paint
- Flour
- Salt
- Water
- Measuring cup
- Plastic zipper-style sandwich bags
Step 1 – Prepare the Puff Paint
Mix equal parts flour and salt a sandwich baggie. Add a teaspoon or so of powdered tempera paint. Add the same amount of water as you used flour and salt. Close the bag and squeeze and knead the mixture until it is completely combined. Pour the puff paint into the squeeze bottles by cutting off one corner of the sandwich bag and piping the paint into the bottles (as you would use a piping bag for icing).
Connect: Have your child help with the measuring and mixing. Kids love to scoop and measure. The feeling of the paint inside the bag is a new sensory experience for them as well.
Step 2 – Paint
Encourage your kids to paint on the paper with the puff paint. Squeeze and pour designs.
Connect: Your child will naturally want to see what happens when they hold the squeeze bottle up high compared with holding it down low. Younger children may want you to draw a design that they can follow with their paint bottle.
Step 3 – Puff!
Put each painting in the microwave for about 30 seconds. This will make the design puff up and dry.
Connect: Show your child what the paint looks like before and after microwaving it. (Be careful, it will be hot when it comes out of the microwave!)
Product Recommendations from Discount School Supply®:
Nancy™ Paint Bottles Classic Tips, 2 oz. – Set of 12
White Card Stock – 100 SheetsSet of 10 Colorations® Powder Tempera Paint – 1lb
Set of 10 Colorations® Powder Tempera Paint – 1lb
Activity Hour: Paper Candy Canes
Make a collection of paper candy canes to decorate your house, hang on your tree, or feed to some reindeer.
What You’ll Need:
- White paper
- Markers
- Crayons, colored pencils, bingo bottles with paint (any decorating medium that dries quickly)
- Tape
Step 1 – Decorate the paper
Cover the paper with color. Use markers, crayons, whatever you choose—just make sure to get lots of color on the paper. If you’re using a messier medium like paint, you might require some extra drying time, so you might have to do the next step tomorrow.
*Tips for Parents: Younger children may make a few marks on the paper and be finished. Encourage these kids to use their bodies to make big marks that cover the whole paper. Talk about movements. Can you move the marker quickly? Slowly? How many lines can you make? Older children (age 2 and up) may have fun drawing patterns. Model how to draw a line (we often make up little songs or rhymes—“Start at the top, and fall to the bottom”). Draw another line next to that one. Keep on going. Or draw a curvy line with lots and lots of squiggles. Color inside the random shapes made by the squiggles.
Step 2 – Roll the paper
Flip the paper over on the table so the patterned side is facing down. You’ll use a marker to roll up the paper into about a 1” tube. Place the marker diagonally across one corner and begin rolling. Secure the end with tape.
*Tips for Parents: Little ones may need help with this step. Encourage them to use a flat hand and feel how the paper rolls under their hand. Give them a little help by holding the tube tight while your child uses his or her hand to roll it.
Step 3 – Shake out the marker
Shake the tube until the marker comes out.
*Tips for parents: Don’t neglect this step—this is one of the most enjoyable parts of this project for some kids! Shake, shake, shake until the marker comes out. If the tube is rolled too tightly, you might have trouble getting the marker out. Encourage your child to try different methods until he or she finds a solution.
Step 4 – Make the candy cane curve
Place the marker perpendicular to the candy cane at the very top end. Flatten and roll the paper tube around the marker. Remove the marker and shape the curve to make a candy cane. Make a bouquet of candy canes and place it in a bucket for your holiday dinner centerpiece.
Product Recommendations from Discount School Supply®:
Perfect Art Paper Pack – 600 Sheets
White 9″ x 12″ Colorations® Heavyweight Construction Paper
Colorations® Simply Washable Tempera Paints, 16 oz. – Set of 15
Colorations® Super Washable Classic Markers – Set of 200
Colorations® Chubby Crayons – Set of 200
Colorations® Jumbo Colored Pencils – Set of 120
Bingo Bottle Refillable Markers with Tips & Caps – Set of 12
Mavalus® White Removable Poster Tape – Set of 3
Craft and Connect: Pumpkin Stamping

What do you do with all those leftover pumpkins and gourds from Halloween and Thanksgiving? Pumpkin stamping, of course!
This is what you’ll need:
- Art paper
- Pumpkins and gourds of any size
- Sharp knife
- Washable tempera
- Paint brushes
- No-drip paint cups
Step 1 – Cut the pumpkins
Cut the pumpkins in half using a sharp knife. Even small pumpkins can be difficult to cut, so adults should do this step. Cut some pumpkins vertically and some horizontally.
Connect: Show your child the inside of the pumpkins and gourds. Have your child feel the inside. Describe how it feels. Is it stringy? Cold? What are the seeds like?
Step 2 – Paint the pumpkins
Use the Washable tempera paint to paint the open side of the pumpkin.
Connect: Your child may want to paint the outside of the pumpkin and the stem. Encourage your child to paint as much of the pumpkin as he or she wants and to use a variety of colors.
Step 3 – Stamp the pumpkins
Press the pumpkin onto the paper to make imprints.
Connect: Talk about the shapes of the pumpkins. Do they make circular shapes? Oval shapes on the paper? Note… they probably won’t make a perfect shape of any kind. Encourage the kids to make big and small movements with the pumpkins. You can even leave the pumpkins face down on the paper overnight to see the effect it makes. The color may change a little, and some seeds may remain on the paper.
Product Recommendations from Discount School Supply®:
Perfect Art Paper Pack – 600 Sheets
Colorations® Simply Washable Tempera Paints, 16 oz. – Set of 15
Activity Hour: Leaf Stamping

This activity involves more than just sitting at the art table—In order to create leaf prints, kids have to find them first! Send them out in the backyard or go on a nature walk to collect leaves, then make some beautiful prints to display during this season.
What You’ll Need:
- Leaves
- Art paper
- Washable tempera
- Paint brushes
- Parchment paper
Step 1 – Find some leaves
Head outside to collect some fall leaves.
*Tips for Parents: Make a list of the types of leaves kids can find: small, big, pointy, round, crunchy, soft, etc.
Step 2 – Paint the leaves
Have kids paint the leaves with paintbrushes. It helps to do this messy step on a piece of newspaper or a tray. (We like to use inexpensive cookie sheets from the dollar store).
*Tips for Parents: Don’t rush this step. Some kids really focus on painting the leaf. Suggest using different colors together on one leaf.
Step 3 – Print the leaves
Turn the leaf over and press it onto the art paper, paint side down.
*Tips for parents: You can print the leaves one at a time or all at once. Cover the leaf (or leaves) with parchment paper and help your child press every part of the leaf down onto the paper. Remove the paper and leaves to reveal the masterpiece.
Product Recommendations from Discount School Supply®:
Perfect Art Paper Pack – 600 Sheets
Colorations® Simply Washable Tempera Paints, 16 oz. – Set of 15
Colorations® Plastic Chubby Paint Brushes – Set of 10
Craft and Connect: Ice Cube Painting
Kids use an unexpected tool to make unique paintings.
This is what you’ll need:
- Watercolor paper (any other kind will get soggy and warped)
- Craft sticks
- Liquid watercolors
- Ice cube tray or small plastic or silicone containers (like a yogurt container)
- Water
- Eye droppers (optional)
- Aluminum foil
- Table salt
Step 1 – Make the ice cubes
Pour water into the ice cube tray. Only fill each compartment about halfway. Squeeze liquid watercolors into each compartment to fill the rest of the way and add color. Cover the ice cube tray with foil and poke a stick through the foil into each ice cube compartment. The foil will help keep the craft sticks relatively straight. Freeze until completely hard.
Connect: Have kids drop in the coloring themselves. Using eye droppers helps develop fine motor skills. Name each color that is used.
Step 2 – Paint!
Once the ice cubes are completely frozen, remove the foil and gently pop the cubes out of the tray. Give your child a sheet of watercolor paper (I like to set it in a cookie sheet to catch the drips). Encourage your child to make marks on the paper with the ice cube.
Connect: Discuss how the marks are made. At first, the marks will be light and barely visible. As the ice melts, the marks become brighter and more colorful. Have your child shake salt onto the ice cube to help it melt. Talk about the colors your child sees. Have your child feel the ice cube and discuss its temperature. This is a great activity for a hot summer day (do it outside) or a blustery winter afternoon (talk about the similarities between the ice cubes and the weather – Brrrr).

